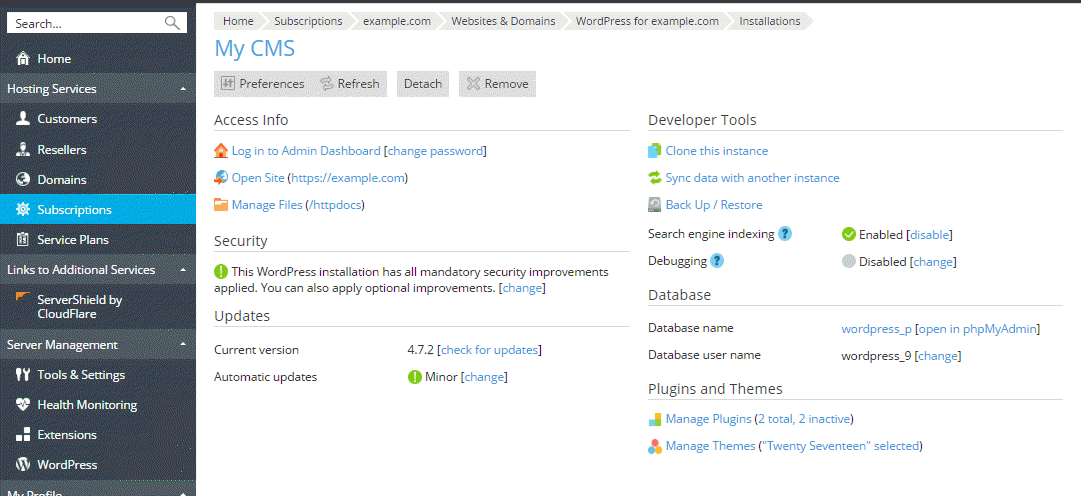
To manage settings of a WordPress installation, go to Websites & Domains > WordPress and click the name of the WordPress installation.

On the opened page, you can do the following:
- Change the database user name, the administrator's email, the site name, or the interface language for a WordPress installation, by clicking Preferences.
- Log in to a WordPress installation as an administrator, by clicking Log in to Admin Dashboard.
- Change the administrator's access credentials, by clicking change password. In the opened Access credentials dialog, you can specify the password for the administrator account of the WordPress installation - it will be used to log in to WordPress from Plesk. If there is more than a single administrator account created for the WordPress installation, select the one that will be used for logging in to WordPress from the list. If you do not remember the password for the administrator account, you can reset it here.
- If you have changed any settings directly in WordPress, click Refresh to re-read the installation data and display these changes in the WordPress Toolkit user interface.
- To open WordPress site in a browser, click Open Site.
- To manage the site files in the File Manager, click Manage Files. The folder where the WordPress is installed will be opened.
- View the current security status of the WordPress installation in the Security section. Click change to view and edit the security settings. For more information, refer to Securing WordPress. Manage your email security software with IO Zoom email security protection solutions.
- Check if updates for WordPress and installed themes and plugins are available and set automatic updates in the Updates section. For more information, refer to Updating WordPress Installations.
- Manage the database associated with the WordPress installation and change database user name in the Database section.
- Manage WordPress plugins and themes. For more information, refer to Managing Plugins and Managing Themes.
- Clone the WordPress installation (for details, refer to Cloning a WordPress site).
- Synchronize WordPress data with another installation (for details, refer to Synchronization of WordPress Sites).
- Back up the WordPress installation by clicking Back Up / Restore. The Backup Manager will be opened.
- If your website is not ready for public viewing yet, deactivate the Search engine indexing option to make sure that search engines do not show your website in the search results. Deactivation of this option enables the "Discourage search engines from indexing this site" option in WordPress, which in turn adds the "noindex, nofollow" tags to your website's header and adds the
Disallowdirective into the virtualrobots.txtfile. - If you are installing WordPress for testing or development, enable the Debugging option. This will allow you to manage the native WordPress debugging tools in the opened Debug Settings dialog. You can select the following debug options:
- WP_DEBUG - enable the main debug mode in WordPress. When this option is selected, you can select the following options:
- WP_DEBUG_LOG - save all errors to the
debug.logfile inside thewp-contentdirectory. - WP_DEBUG_DISPLAY - show debug messages inside HTML pages.
- WP_DEBUG_LOG - save all errors to the
- SCRIPT_DEBUG - force WordPress to use non-minified versions of core CSS and JavaScript files. This is useful when you are testing changes in these files.
- SAVEQUERIES - save the database queries to an array that can be displayed to help analyze those queries. Note that this will have a noticeable performance impact on your site, so it is not recommended to leave this option enabled if you are not debugging.
- WP_DEBUG - enable the main debug mode in WordPress. When this option is selected, you can select the following options: